
The Three Most Common Running-Related Injuries: Causes, Rehab, and Prevention
Running is one of the simplest, most freeing forms of exercise — yet it’s also one of the most injury-prone. Whether you’re training for your first 5K or chasing a Boston Marathon qualifier, chances are you’ve felt that familiar twinge in your knee, shin, or heel at some point.
The good news? Most running injuries are preventable and fully treatable — especially when you understand why they happen and how to address the root causes, not just the symptoms.
The Overlooked Role of Training Errors
Before diving into specific injuries, it’s important to understand the single biggest culprit behind them all: training errors.
Research over the last decade shows that more than half of all running-related injuries occur when runners ramp up their mileage or intensity too quickly. The heart and lungs adapt fast, but muscles, bones, and tendons need more time to strengthen. That creates what experts call the “injury window” — a period when you feel fitter than your tissues can handle.
Ignoring this gap leads to the same story: you feel great one week, push a little harder the next, and then… pain. It’s not just bad luck — it’s overload.
1. Patellofemoral Pain Syndrome (PFPS)
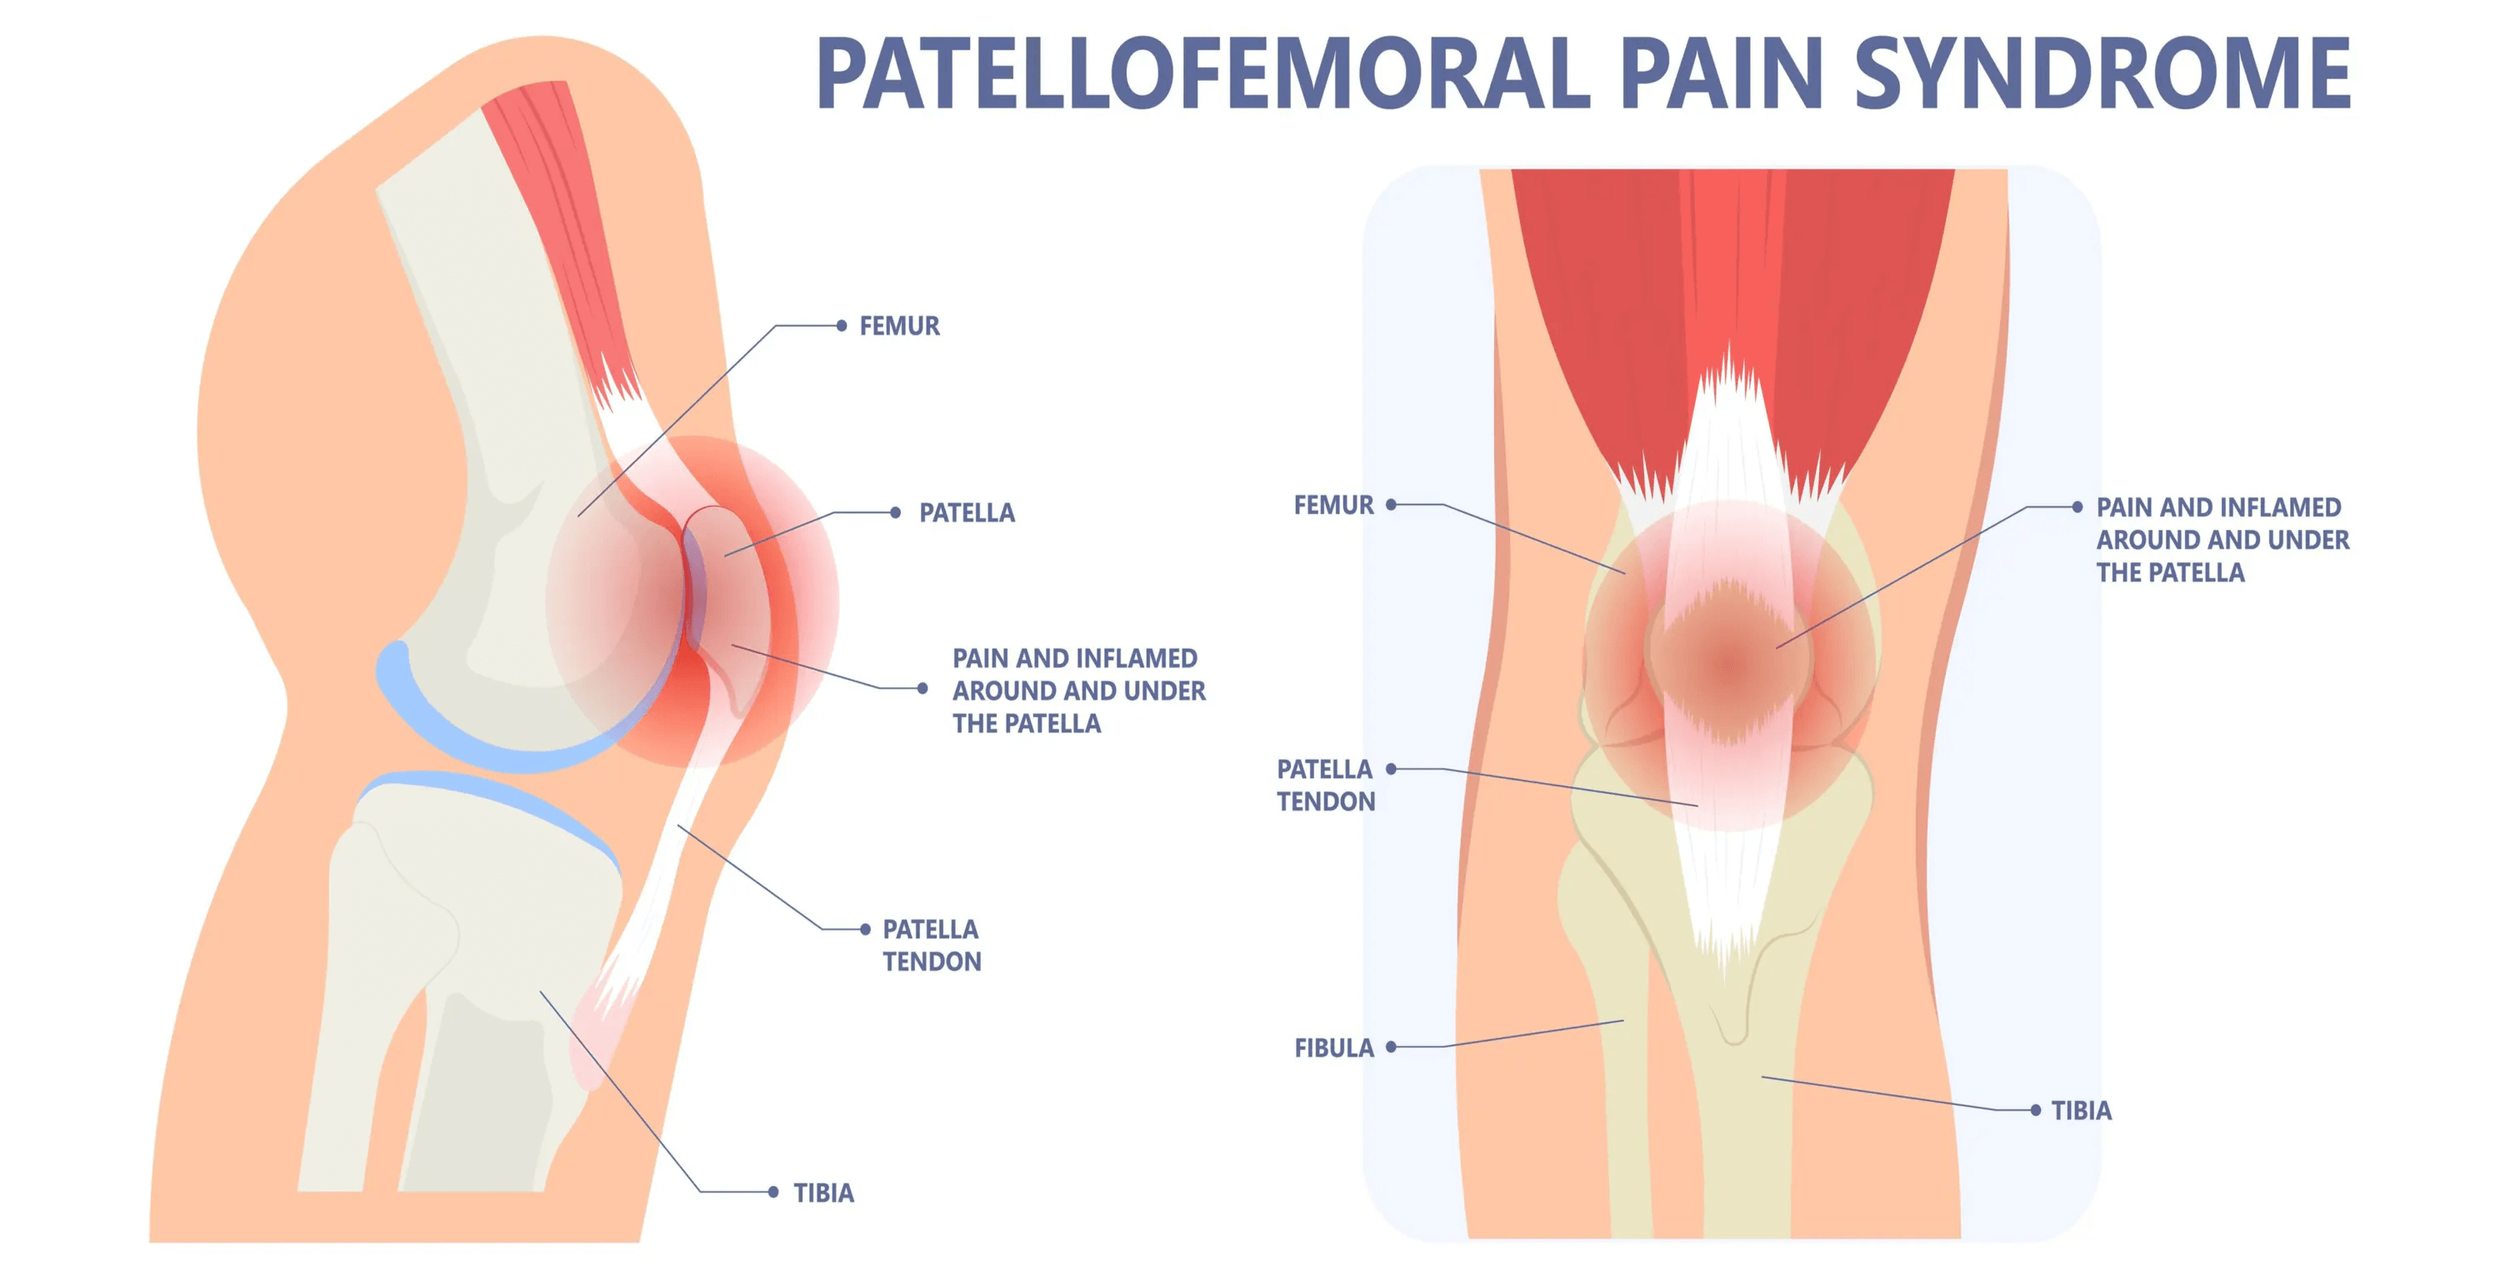
If you’ve ever felt a dull ache around or behind your kneecap — especially when running downhill, sitting too long, or climbing stairs — you’ve probably experienced Patellofemoral Pain Syndrome (PFPS), often called runner’s knee.
This injury develops when the tissues around the front of the knee — including the joint cartilage, tendons, fat pad, and surrounding soft tissues — become irritated from repeated loading or insufficient recovery. It’s one of the most common running-related pains, often triggered by overuse, sudden increases in training volume or intensity, or muscular imbalances that place excess stress on the knee joint.
But the good news? With a structured plan that blends rehab, strength, and smart running progressions, most runners can return to pain-free running — and even come back stronger than before.
Stage 1: Pain Reduction & Physical Therapy
The first step is calming the irritation while maintaining as much healthy movement as possible. In this stage, the focus is on reducing pain and inflammation, restoring mobility, and reintroducing controlled loading to the knee.
Running Adjustments:
Avoid running if pain is greater than 4/10 during activity.
If discomfort is mild (less than 4/10) and settles within 24 hours, try run/walk intervals (e.g., 2 minute run / 2 minute walk x 6-10 rounds).
Default to easy pace runs — skip hills or speedwork if they increase pain.
Key Rehab Exercises:
Foam Rolling or Soft Tissue Work – Release tension in the quads, IT band, and calves.
Terminal Knee Extensions (3x15) – Strengthen the quadriceps without aggravating symptoms.
Sidelying Hip Abductions (3x15 each side) – Strengthen glute medius to improve hip stability.
Lateral Toe Taps (3x15 each side) – Improve single leg stabilization and knee alignment.
Gentle mobility drills for the hips and ankles to promote proper knee control during movement.
During this phase, the goal isn’t to stop all activity — it’s to keep the joint moving without crossing the pain threshold that worsens the injury.
Stage 2: Return to Sport
Once pain levels are under control, the next step is to reintroduce functional movement, proper mechanics, and strengthening to tolerate running loads again.
Running Form Focus:
Increase your running cadence by about 5–10% to reduce overstriding and knee stress while promoting softer, more efficient landings.
Use softer surfaces or treadmill running early in this phase to manage impact.
Strength Training Focus:
Hip Bridge with Straight Leg Raise Holds (3x20 seconds each side) – Strengthens the hip and builds stabilization between core/hip/limb.
Single Leg Side Planks (3x10 steps each way) – Strengthen the glute medius and hip stabilizers.
Lateral Step-Downs (3x10 each side) – Build control through the knee’s range of motion.
Core stability work (e.g., dead bugs, bird dogs) to control trunk alignment during running.
Running volume increases gradually here, using pain and recovery as the guide.
Stage 3: Performance Phase
With pain gone and strength restored, the focus now turns to building power, endurance, and load tolerance for long-term success.
High-Performance Strength & Plyometric Training:
Barbell or Dumbbell Squats (3x6) – Reinforce whole-leg strength under load.
Rear Foot Elevated Split Squat (3x10 each leg) – Strengthen leg muscles in a pattern that mimics running.
Depth Landing (3x6) – Develop dynamic knee control and resilience during the landing phase.
Lateral Skater Jump with Stick (3x5 each side) – Train lateral stability and power development.
Running Plan Progression – FDI Principle:
Frequency: Add one extra run per week every 2–3 weeks when pain-free.
Duration: Increase total weekly mileage by 10% at most.
Intensity: Reintroduce hill repeats or speed sessions after maintaining consistent, pain-free base mileage for 3-4 weeks.
The combination of progressive strength training and gradual load progression ensures the knee becomes more resilient to future stress.
2. Medial Tibial Stress Syndrome (MTSS)
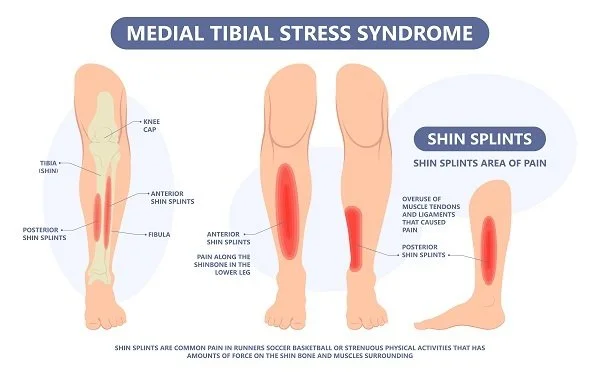
If you’ve ever felt a deep, aching pain along the inside of your shin — especially early in a run or after increasing your weekly mileage — you’ve likely experienced Medial Tibial Stress Syndrome (MTSS), better known as shin splints.
This condition develops when repetitive impact causes microtrauma and irritation to the soft tissues and bone lining (periosteum) along the tibia. It’s common among runners who ramp up training too quickly, switch to harder running surfaces, or train in worn-out shoes. Weak/tight calves, poor stabilization, and faulty running mechanics can also contribute.
The goal of recovery isn’t just to stop the pain — it’s to restore the tissue’s load tolerance and rebuild your running base in a way that prevents recurrence.
Stage 1: Pain Reduction & Physical Therapy
The priority in this stage is to calm down irritated tissues and restore pain-free motion, while maintaining some level of conditioning through modified activity.
Running Adjustments:
If pain is greater than 4/10 while running, replace high-impact workouts with low-impact cross-training, such as cycling, pool running, or elliptical sessions.
If discomfort is mild (≤3–4/10) and resolves within 24 hours, try run/walk intervals (e.g., 2 minute run / 2 minute walk x 6-10 rounds).
Stick to easy pace running — speedwork or hill repeats should wait until pain-free.
Key Rehab Exercises:
Foam rolling and gentle stretching of the calves, shins, and feet 1–2× daily.
Calf Raises (3x15) – builds strength and endurance in the gastrocnemius and soleus to handle impact.
Tibialis Posterior Raises (3x15) – strengthen the muscle supporting your arch and shin.
Toe Yoga & Short Foot Drills (3x10) – train foot intrinsics for better stability.
Soleus Wall Sit (3x30-60 seconds) – targets the deeper calf muscle critical for shock absorption.
Stage 2: Return to Sport
Once symptoms are under control, the next focus is restoring strong, efficient movement mechanics while gradually reintroducing load.
Running Form Focus:
Both forefoot and heel striking affect how force travels through the leg — forefoot striking increases muscular activity in the lower leg (and therefore stress on the tibia), while heel striking raises impact forces transmitted into the shin.
The key is to find the most pain-free strike pattern for your body and avoid changing your form too quickly, as abrupt shifts can cause new injuries.
Focus on landing softly under your center of mass, not ahead of it.
Maintain a slight forward lean from the ankles to improve propulsion and shock absorption.
Strength Training Focus:
This phase transitions from isolated lower leg strengthening to integrated kinetic chain control:
Single-Leg Calf Raises (3x15 each side) – improves symmetry and tendon strength.
Lateral Band Walks (3x15 steps each way) – enhances hip and knee control during stance.
Lateral Step Downs (3x10 each side) – train controlled loading of the shin and calf.
Tip Toe Walking (3x15 feet) – challenges the calf complex and foot stabilization.
Ankle Hops (3x10) – build explosive strength and tendon reactivity.
Begin short, soft-surface runs every 2–3 days and gradually increase duration while monitoring symptoms.
Stage 3: Performance Phase
This stage focuses on building true resilience — developing the strength, stiffness, and energy return needed for higher mileage and faster paces.
High-Performance Strength & Plyometric Training:
Introduce advanced loading and plyometrics once you can run pain-free for several weeks:
Front Foot Elevated Calf Raises (3x10 each leg) – build calf strength and resilience under load.
Single Leg Deadlift (3x10 each leg) – enhance single leg stabilization and foot control.
Pop & Float (3x10) – challenge timing/coordination with a running-specific pattern.
Single-Leg Hops (3x5 each leg) – simulate impact forces of running.
Running Plan Progression – FDI Principle:
Frequency: Add one extra running day every 2–3 weeks once pain-free.
Duration: Increase total mileage by no more than 10% per week.
Intensity: Gradually reintroduce hills or intervals after maintaining consistent, pain-free base runs for at least 2–3 weeks.
Strength training should remain a weekly habit (2x/week minimum), emphasizing calf, hip, and core stability to reduce tibial stress.
3. Achilles Tendinopathy
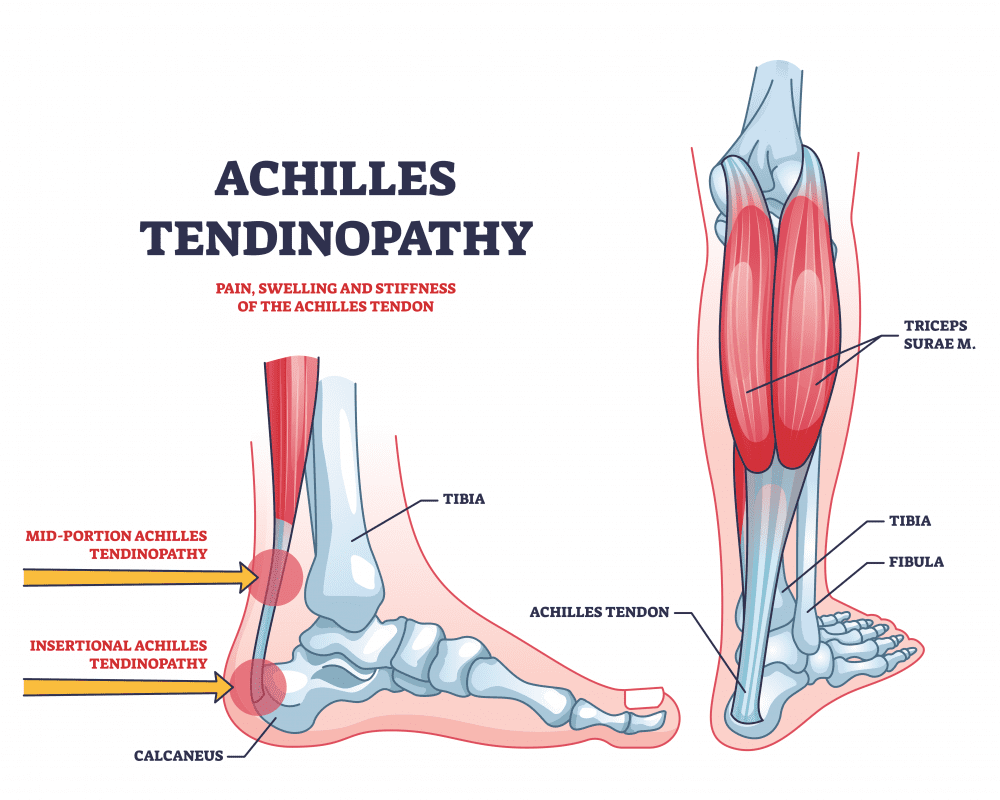
The Achilles tendon is the thick, cord-like structure that connects your calf muscles to your heel bone. It’s one of the strongest tendons in the body — and one of the most commonly injured in runners.
Achilles tendinopathy occurs when the tendon fibers become irritated or degenerate from repetitive overloading. It often begins with stiffness or tightness in the morning or after a run, then progresses to pain during activity if ignored. The root cause is almost always a mismatch between training load and tissue tolerance — often following a jump in mileage, hills, or speed work. Tight calves, limited ankle mobility, or poor foot control can also contribute.
Recovery from Achilles pain requires patience and structure — not rest alone. This tendon thrives on progressive loading, and the right plan can restore its strength and elasticity for powerful, pain-free running.
Stage 1: Pain Reduction & Physical Therapy
The first priority is to reduce pain and stiffness while beginning gentle loading to stimulate healing. Completely avoiding activity may feel like the safe route, but research shows that light, pain-tolerable movement actually promotes faster recovery than full rest.
Running Adjustments:
Avoid running if pain exceeds 4/10 during or after your session.
If discomfort is mild (≤3–4/10) and resolves within 24 hours, try run/walk intervals (e.g., 2 minute run / 2 minute walk x 6-10 rounds).
Stick to flat, easy runs — pause hill or speed workouts until pain-free.
Consider temporary heel lifts or higher-drop shoes to reduce strain on the tendon.
Key Rehab Exercises:
Isometric Calf Holds (5x30-60 seconds) – Elevate the heels off the floor and hold to stimulate tendon healing without high strain.
2-to-1 Eccentric Calf Raises (3x15) – Perform on flat ground OR stand on a step, lift with both feet, and slowly lower with one. Focus on controlled descent.
Soleus Wall Sit (3x30-60 seconds) – Strengthen the deeper calf muscle crucial for tendon support.
Ankle Mobility Drills (2–3 sets) – Gentle dorsiflexion stretches to improve range of motion.
Special Note:
There’s an important distinction between insertional and mid-portion Achilles tendinopathy…
Mid-portion injuries occur higher up the tendon and typically respond well to traditional heel drop and calf strengthening exercises.
Insertional injuries, however, affect the area where the tendon attaches to the heel bone (calcaneus). For these cases, it’s best to avoid excessive calf stretching or performing heel drops with your heels hanging off a step, as this increases compressive stress at the tendon’s attachment point. Instead, perform calf raises on flat ground and progress loading carefully under the guidance of a physical therapist.
Stage 2: Return to Sport
Once baseline pain decreases and tendon tolerance improves, the focus shifts to restoring functional strength, balance, and running form.
Running Form Focus:
Mid- and forefoot strike patterns can increase muscular activity in the calf and plantar foot muscles, which may raise stress on the Achilles tendon.
Heel lifts or higher-drop shoes can help temporarily reduce strain by decreasing how much the tendon is stretched with each step.
Avoid overstriding — aim for your foot to land close beneath your body.
Focus on light, quick steps rather than forceful push-offs to limit excessive tendon loading.
Strength Training Focus:
This phase moves from simple rehab drills to multi-plane, sport-specific strength:
Single-Leg Calf Raises (3x15) – Train strength and control under realistic running loads.
Tip Toe Walking (3x15 feet) – challenges the calf complex and foot stabilization.
Ankle Hops (3x10) – build explosive strength and tendon reactivity.
Step-Ups with Knee Drive (3x10) – Strengthen calf-hip linkage for efficient push-off.
During this stage, increase running frequency gradually (2–3 runs per week), keeping effort easy and focusing on consistent, pain-free strides.
Stage 3: Performance Phase
When your Achilles can handle normal running volume and strength work pain-free, it’s time to rebuild elastic powerand prepare the tendon for higher speeds and greater mileage. This is where we focus on performance-level conditioningand fine-tuning your running plan.
High-Performance Strength & Plyometric Training:
Barbell Calf Raises (3x10) - Increase calf strength and tendon resiliency.
Split Stance Calf Raise (3x15 each leg) – Build soleus strength and foot stabilization.
Ankle Hops (Forward; 3x10) – build explosive strength and tendon reactivity while creating forward motion.
Single-Leg Hops (3x10 each leg) – Build dynamic control and shock absorption.
Running Plan Progression – FDI Principle:
Frequency: Add one additional running day every 2–3 weeks if pain-free.
Duration: Increase mileage by no more than 10% per week.
Intensity: Gradually reintroduce speed, strides, and hills once you’ve maintained consistent volume pain-free for at least 3 weeks.
Regular maintenance is critical. Continue calf and soleus strength work 2× weekly, along with mobility and recovery sessions to keep the tendon healthy under load.
The Science of Smart Training
Injury prevention isn’t about avoiding running — it’s about respecting your body’s limits. The key is progressive overload: small, steady increases in mileage and intensity that allow tissues to adapt.
Follow these principles:
Increase weekly mileage by no more than 10%.
Build for 2-3 weeks before adding a drop week that’s slightly less in volume.
Alternate hard and easy days.
Prioritize recovery with complete days off, sleep, nutrition, and hydration.
Listening to early warning signs — stiffness, soreness, or swelling that lingers — can save you weeks of downtime later.
From Pain to Performance: How Pure Movement Helps You Run Stronger
At Pure Movement, we know that real recovery goes beyond pain relief. Our mission is to help runners move better, train smarter, and come back stronger than ever.
Whether you’re just getting back on your feet or aiming for your next personal best, our science-based programs blend three essential components of long-term success:
Physical Therapy: Expert diagnosis, hands-on treatment, and tailored rehab exercises.
Return-to-Sport Training: Progressive loading and strength training to rebuild resilience.
Running Coaching: Form analysis, gait retraining, and performance-based programming.
We’ve helped countless local runners go from injured and frustrated to crossing finish lines — including those who’ve gone on to qualify for the Boston Marathon.
No matter where you are in your journey, Pure Movement provides the bridge between injury recovery and athletic performance — all built on the science of movement.
Ready to take the next step?
Contact us TODAY and start your path from pain to performance.